(888) 569-9499CONTACT US
0Item(s)

You have no items in your shopping cart.

Product was successfully added to your shopping cart.

programming software

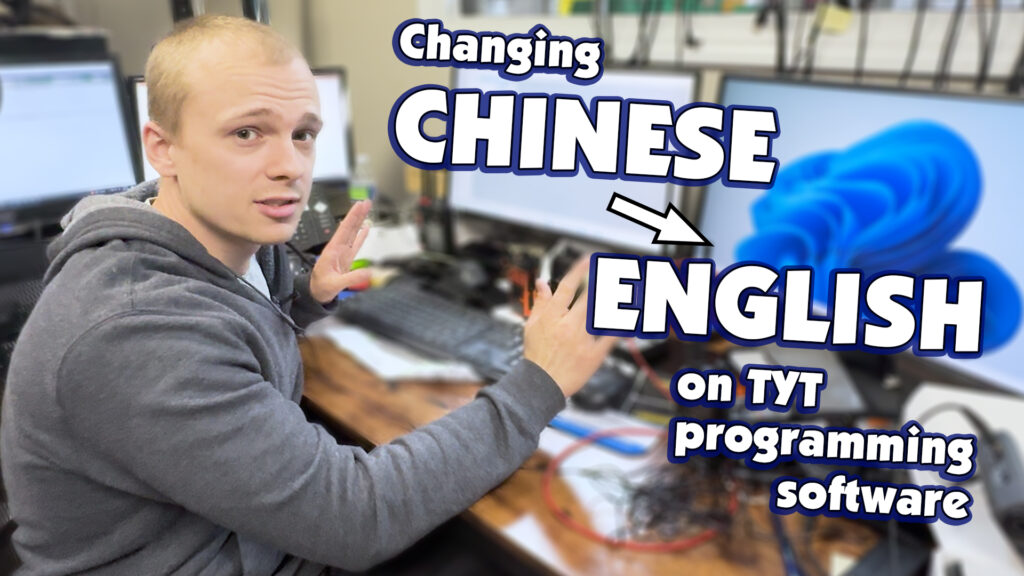
  • How to Change the Language Mode on the TYT Programming Software

    Upon installing the programming software for the TYT MD-UV380 Plus, MD-UV390 Plus, and MD-9600 two way radios, the language is set to Chinese by default. Since most Windows computers operating in the English language do not use a Chinese font, it usually displays indecipherable symbols and letters as a result. How do you change it to English?

    In this quick video tutorial, Steven from our tech department at Buy Two Way Radios demonstrates how to change the language in the TYT Programming Software from Chinese to English.

    Want more videos about 2-way radios? Browse our video blog and subscribe to our YouTube channel!

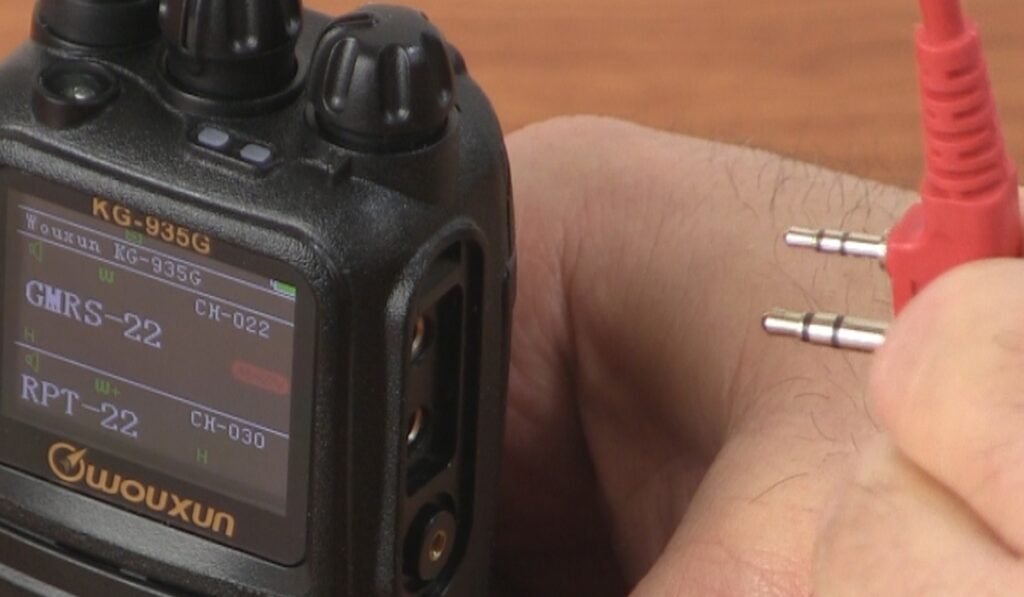
  • The Wouxun KG-935G is now supported by CHIRP!

    Wouxun KG-935G and Programming CableIf you are the proud owner of the popular Wouxun KG-935G GMRS two way radio, and have been frustrated with the fact that the programming sofware provided by Wouxun only works on a Windows PC, the time has come to rejoice. The Wouxun KG-935G is now officially supported by CHIRP!

    With the release of chirp-daily-20220909, the KG-935G is now officially listed as one of the radios that can be programmed using the CHIRP programming software. This should come as a great news to fans of the KG-935G who are also users of CHIRP and use it as their app of preference for programming popular amateur radios.

    CHIRP makes it easy to program channels, frequencies, CTCSS tones, DCS codes and power levels into the 935G, as well as allowing you to configure and customize various features of the radio.

    That's not all. In addition to all the standard programming options, the CHIRP software will allow you to edit the message that is shown on the display when an area is off. Currently it is fixed at "KG-935G", but through CHIRP you can edit it to display any text you want. You can find this option in CHIRP by going to Settings, choosing OEM Info and changing the in the first box titled Model / Bottom Banner. The limit is eight alphanumeric characters.

    CHIRP generally allows importing and exporting from another radio that was also programmed with the app. The import/export capabilities can be utilized with the KG-935G GMRS radio as well. You can export your frequencies from another radio and import them into your 935G file without having to retype everything. You can also copy and paste between files.

    But the news is even better. In addition to Windows, CHIRP also supports Mac and Linux! The lack of Mac and Linux support from Wouxun has been a bone of contention with some customers who want to program their Wouxun KG-935G on their computer but don't have Windows PC. Now that the KG-935G can be programmed using CHIRP, this is no longer an issue.

    Thanks go to Mel Terechenok for volunteering his time and effort to create the driver and adding the KG-935G to CHIRP to make this possible!

    Note: CHIRP is third party software and is not produced or supported by Wouxun or Buy Two Way Radios. While we have confirmed that the functionality seems to work well with the KG-935G, we cannot guarantee that there are no bugs or that future updates won't cause issues. We cannot be held responsible if there are problems with your radio as a result of using CHIRP. Use at your own discretion and risk.

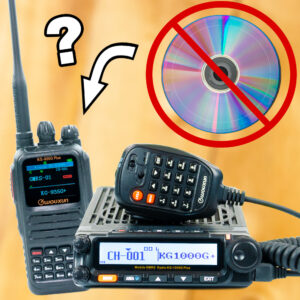
  • How to install the Programming Cable and Software for the KG-905G

    The Wouxun KG-905G is a very easy GMRS radio to setup and use. It's even easier to program using the programming software. However, when first installing the software, you may encounter an issue that prevents it from recognizing the programming cable, even one that has been used before to program other radios. Fortunately, there is an easy fix. In this article, we're going to walk you through the installation process so this issue doesn't occur to begin with.

    Here is how to install the programming cable and software for the KG-905G and avoid this issue.

    Step 1 - Install the programming cable
    Wouxun KG-905G Data File BackupIf you have a Baofeng, TYT or other Wouxun analog ht radio equipped with a 2-pin Kenwood style (K1) connector port, chances are you already have a programming cable and the driver for it installed in your computer. This same cable should work with the KG-905G. If not, you will need the Wouxun PCO-001 or XLT Painless Programming Cable. We recommend the XLT cable for easiest installation and use.

    Step 2 - Download the KG-905G programming software
    The KG-905G programming software is a free download and is located on the KG-905G product page at Buy Two Way Radios. Click on the Downloads tab, click on Wouxun-KG-905G-Programming-Software and download it to your computer. This software runs on Microsoft Windows only. Wouxun does not offer a version for iOS or Linux at this time.

    Step 3 - Install the programming software
    Unpack the compressed (zip) folder and run the file kg-905g-software.exe. This software is specific to the KG-905G and is quite different from the programming software for other Wouxun radios. Although not specifically branded as such, this is the software officially provided by Wouxun for the KG-905G.

    When you run the installation, Windows Defender or your third party anti-virus application may flag it as potential malware. These warnings are a false positive. Allow the installation to proceed.

    Once installation is complete, there should be a shortcut on your desktop for the KG-905G programming software. Before running the software, however, there is one additional step to perform. You will need to set it to run in Windows 8 Compatibility Mode.

    If you attempt to run the software immediately after installation, the application won't see your programming cable unless it happens to be on com port 1. If you click Setup on the menu bar and go to Com Setup, all the com ports will likely be grayed out. The fix is to run it in Compatibility Mode.

    First, close the programming software. Next, right-click the KG-905G shortcut icon on the desktop, choose Properties in the pop-up menu, and click on the Compatibility tab.

    If there in no shortcut on your desktop, find the KG-905G app in the start menu, right-click it and choose Open File Location. The Explorer window will appear with the KG-905G shortcut. Right-click the shortcut and go to Properties.

    From the Properties window, select the Compatibility tab and then check “Run this program in compatibility mode for” box and select Windows 8 in the drop-down box. Click Apply, Click OK, and your done.

    Now, run the KG-905G programming software. Choose Setup in the menu bar, go to Com Setup, select the active Com port assigned to your progamming cable, and click the ?? button (yeah, we know) to choose it. The programming software should now recognize your programming cable and communicate directly with your radio.

    If these instructions are followed correctly, you should be able to read and write to the KG-905G with ease. If they do not work for your configuration, contact us. Keep in mind these instructions are for Microsoft Windows PCs only and only for use with a properly installed programming cable connected to a Wouxun KG-905G GMRS radio.

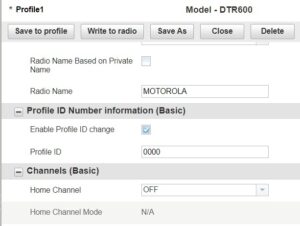
  • Motorola DTR600 and DTR700 firmware and software update for July 2020

    Motorola DTR600 Change Profile IDMotorola just released new firmware and software for their DTR600 and DTR700 900MHz digital two way radios. The update includes a bug fix and a tweak to an existing feature in the radio settings.

    The bug fix resolves an issue that causes the display to freeze. When this issue occurs, the display will freeze, but the radio is otherwise still operational. It can receive and transmit calls and will also power off, however the screen will be locked up.

    The feature tweak is a change to the programming software for Enable Profile ID under the Profile ID Number information. On the DTR600, the Enable Profile ID to Change Pin Code is set to Enabled by default from the factory. This change applies to the DTR600 only and does not apply to the DTR700.

    According to Motorola, the DTR600 and DTR700 can be updated from radios with the original factory settings or those with the phase 1/2 patch installed. The radio should update successfully no matter which version was previously installed.

    Important Note: This update should only be applied if you are already experiencing these issues. If you are using the DTR600 or DTR700 radios with default factory settings, the update should not be necessary.

    The firmware updates the DTR600 and DTR700 to version R01.02.02, Codeplug Version: R01.02.01 and Keypad Version: R01.02.00.

    The update files are now available as listed below.

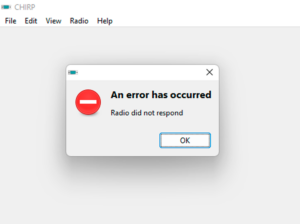
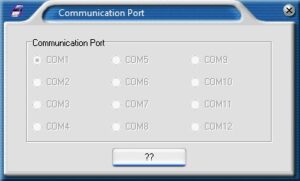
  • What to do if the radio programming software does not detect the cable or COM port

    You've just received your two way radio, taken it out of the package, and now you want to get it operational. You plugged in the programming cable, downloaded the driver, set up the software, and connected the cable the radio to program it.

    There is just one small glitch. When you run the program, the software can't seem to find the radio. It can't connect to the cable. It can't even find the COM port. What gives?

    First, don't panic or blow a fuse. There are several devices in the mix and multiple connections here, plus an entire computer system. It could be anything. Before you pack up all the new stuff and send it back to the dealer, find out what the real problem is. It may not be as bad as you think. It may even be quick and easy to resolve.

    Here are the steps to troubleshoot if the programming software for your two way radio does not recognize the COM Port or the programming cable purchased from Buy Two Way Radios.

    Step 1. Verify the programming cable is installed correctly.

    • If using our programming cable and it is installed correctly, proceed to Step 2.
    • If programming cable is not installed correctly, re-install the cable driver.

    Step 2. Verify the COM Port number assigned to your programming cable.

    • If you are running Microsoft Windows, go the the Device Manager and click on Ports (COM & LPT).
    • Note the number of the COM port assigned to your cable.

    Step 3. Verify the correct COM Port is recognized and listed as active in the programming software.

    • If the COM port assigned to the programming cable is listed as active and available, choose it and skip to Step 5.
    • If the COM port assigned to the programming cable is NOT listed as available, go to Step 4.

    Step 4. Assign another COM Port to the USB programming cable.

    • Open the Device Manager, go to Ports (COM & LPT) and right click on the listing for the USB programming cable.
    • Click PROPERTIES in the pop-up menu.
    • Click on the PORT SETTINGS tab.
    • Click the ADVANCE button.
    • Click the drop down list next to COM Port Number: and choose a COM Port below the number 10 that is not in use.
    • Click OK to save the setting, then click OK again to exit the Communications Port (COMX) properties window.
    • Note the new COM Port number assigned to the USB Programming Cable and go back to Step 3.
    • If a new COM Port number was assigned to the cable and it is still not recognized by your programming software, skip to Step 6.

    Step 5. Run or close and restart the programming software.

    Step 6. If the program does not recognize the programming cable or the COM Port assigned to it, refer to the manufacturer of the programming software.

    If you are using CHIRP programming software, go to the CHIRP web site at http://chirp.danplanet.com/projects/chirp/wiki/Home and download the latest daily build of CHIRP or report the issue to CHIRP.

    If these instructions are followed correctly, the programming software for your radio should be able to recognize the correct COM port and access your programming cable.

5 Item(s)