(888) 569-9499CONTACT US
0Item(s)

You have no items in your shopping cart.

Product was successfully added to your shopping cart.

Articles

  • Which TYT radios are superheterodyne?

    TYT Radios

    There is one frequently asked question that, until the last year or so, was rarely asked at all. Now we hear it at least once almost every day. Is it superhet? Lately we've been asked this question in regards to radios made by TYT. This is not information that is typically provided by a manufacturer voluntarily. So, we had to ask them directly. Which TYT radios have a superheterodyne receiver? Here was their answer.

    The table below lists the TYT radios we carry and the type of receivers they use.

    TYT Radio Receiver Specifications
    Model Service Band Form Factor Analog/Digital Receiver
    TH-350 Amateur Tri-Band Handheld Analog Direct Conversion
    TH-9800 Amateur Quad Band Mobile Analog Superheterodyne
    TH-UV88 Amateur UHF/VHF Handheld Analog Direct Conversion
    MD-380 Amateur UHF/VHF Handheld Digital Superheterodyne
    MD-390 Amateur UHF/VHF Handheld Digital Superheterodyne
    MD-9600 Amateur UHF/VHF Mobile Digital Superheterodyne
    MD-UV380 Amateur UHF/VHF Handheld Digital Direct Conversion
  • How to get a GMRS License in only four steps

    Getting your GMRS license has never been easier. Really, it hasn't. This is because it's never been easy at all. Unlike the main FCC web site, the portion of the site where you get a license, known as the Universal License System, or ULS, seems to be it's own little ecosystem. Unfortunately, the ULS isn't exactly a modern, intuitive web experience.

    Before 2017, the FCC site as a whole was an archaic design, a throwback to the mid 1990's that was excruciatingly cumbersome to navigate and use. At some point the Commission decided to modernize it, but for some reason neglected to update the front facing side of the COmmission REgistration System (CORES) site as well, which included the Universal License System, or ULS. The result was a mashup of relatively modern web design butted up against crude, pre-millennial blast from the past. Imagine driving down a four lane freeway and suddenly turning onto an old dirt road. The ULS was something like that. It also was not mobile friendly, so if you wanted to do this on a tablet or cell phone, good luck.

    In the fall of 2022 the FCC apparently updated the site again. It is now known as the New CORES. Before you get too excited though, it looks about the same as the old CORES, with a few minor upgrades, which at least brings it up to the year 1999. It is still not very mobile friendly. It's like steam punk without the steam or the punk. We recommend you use a desktop computer to navigate the site. At least it's functional.

    Aside from navigating decades old web site technology, getting a GMRS license isn't really that hard at all. It just takes some patience and a little perseverence. You could say it's even kind of amazing, in the sense that you're going through a maze. You have to know where to go and what information to provide. Oh, and if you really like to fill out forms, you'll love this. If you don't, maybe not. Just try not to think about it.

    Here's where and how to apply for a GMRS license in only four steps.

    Step 1. Register for a Username
    Note: If you already registered in CORES, you can skip this step.

    To register for an FCC Username, go to the FCC Universal License System (ULS) page, and under the Filing sub-heading, click New User Registration. This will take you to the FCC Registration Login page. Select the option Register under the column header Need a Username?. This will take you to the online FRN registration form.

    Before you fill out the form, you will need to perform a search to verify that the you are not already registered. Enter your email address in the field and click the button marked Check Availability. This will be your username. If your email address is unavailable, follow the instructions in the latter part of this video to retrieve your existing password.

    If your email address/username is not already listed, proceed to the form. Fill out the form with your name and address, and choose a password. The FCC requires the password have a minimum of 12 characters and a maximum of 15 characters, and must meet all of the following criteria: at least 1 lower case letter, 1 upper case letter, 1 number, and 1 punctuation mark/special character.

    Next, select a personal security question, enter an answer and click Submit. After the form is submitted, there will be a process by which your email address/username needs to be verified. Once verified and accepted, click on the button GoToCores to continue with step 2, where you will need to register for an FRN number.

    Step 2. Register for an FRN number
    Note: If you already have an FRN number, you can skip this step.

    Before you apply for any FCC license, you will need an FCC Registration Number, commonly referred to by the Commission as an FRN. Your FRN is a 10 digit number that identifies you when conducting financial transactions with the FCC. As a social security number identifies you as a taxpayer with the IRS, an FRN identifies you as a fee payer with the FCC. Ironically, the form will require your SSN as well, so be ready for that.

    The important thing to remember is that your FRN will be used for all license applications, changes, renewals and upgrades. Once you have an FRN, it's your number for life.

    To apply for an FRN, click on the button mentioned at the end of step 1 or go to the FCC Universal License System (ULS) page, go to the Filing sub-heading and under the Username Login section, login with your Username and password. Either method will take you to the User Home page.

    Now, here's where it gets interesting. On this page you will find the following six options:

    • Associate Username to FRN - Link your registered username to an existing FRN.
    • Manage Existing FRNs | FRN Financial | Bills and Fees - View & Pay Regulatory Fees, Application Fees, and Bills | View Red & Green light status.
    • Register New FRN - Register and receive a new FRN (including Restricted Use Frn).
    • Reset FRN Password - Reset/update your FRN password.
    • Search for FRN - Search for public FRN information.
    • Update your username profile.

    If you already have an FRN, skip to step 3. For the rest of us, the one to click on is the third item, Register New FRN. This will take you to a box with radio buttons for registration options.

    FRN Registration

    There are two registration types, business and individual. A business cannot apply for a GMRS license, so you would choose An Individual. Your contact address should be within the United States or its territories, so this is the option to choose. Click Continue.

    FRN Registration 2This takes you to a second box with another set of radio buttons. Choose CORES FRN Registration and click Continue.

    FRN Registration 3This will take you to the actual online FRN registration form. yeah, another form. Fill out the form with your name and address.

    After the form is submitted and accepted, you should be taken to a page with your FRN registration information, along with your assigned FRN number, which should appear at the top of the information box. It is important to write this number down and keep it in a safe place for reference later, as this is the number for which you laboriously applied.

    As an important side note, if you already have existing FRNs, you must associate them with your username before you can manage them. To do so, go back to the User Home page, click on Associate Username to FRN and fill out that little form.

    Step 3. Apply for the license
    Once you have your FRN number, you can begin the actual license application process. Go to the FCC Universal License System (ULS) page and under the Filing sub-heading Click File Online. This should take you to the License Manager login page. Enter your new FRN number and password to log in.

    You should now be on the My Licenses page. Click the link on the left sidebar labeled Apply for a New License. This will take you to another page with a drop-down to select the service license for which you want to apply. You will want to choose the option ZA - General Mobile Radio (GMRS). Click the continue button, Choose No for all three drop-downs on the next page, click continue again and will be taken to - you guessed it - another form. Fill out that one, submit it, and it should take you to the page Manage Existing FRN(s).

    This page has a lot of intimidating looking red type, and four options from which to choose:

    • Manage FRNs
    • FRN Financial
    • Regulatory Fee Manager
    • ULS Pay Fees

    Thought you were done? Not quite. Now you have to pay the fee. On a normal web site, this would actually be a simple and intuitive step at the end of the application process. fill out the application, click pay, and you're done. But this isn't a normal web site. It's the domain of the FCC. This means that for some convoluted reason it has to be unnecessarily complicated. We've already filled out two forms with what was basically the same information. Now we're off to yet another area of the FCC website.

    Step 4. Pay the license application fee
    On the Manage Existing FRN(s) page, click on FRN Financial. This will take you to the page where you begin the fee payment process. It should list your FRN number on the left and the link View/Make Payments to the right. Click the link to go to yet another page with the FRN listed under the tab Awaiting Payment Confirmation and a Make Payment link to the right. Click that link, fill out the payment form, and submit. Now you're done.

    The FCC should issue your GMRS callsign within a few days. To check the status of your license and callsign, simply log into the ULS License Manager.

    And there you have it. That's how to apply for a GMRS license from the FCC in only four steps.

    Hey, I said there were only four steps. I didn't say they were easy.

  • Wouxun S-Series Radio Comparison

    Wouxun KG-S-Series Two Way RadiosThe Wouxun S-Series of two way radios consists of five models encompassing four different radio services. These include Aviation, Business, CB, and GMRS. Each model is specifically made for the service on which it functions. All models are FCC type accepted to legally operate on the band, frequencies and service for which they are assigned.

    While there are some standard features that are built-into the entire S-series by default, there are also some important differences. These differences are primarily due to the requirements and limitations imposed by the FCC on radios that operate on a specific service.

    Below is a reference chart with a general overview of the differences and similarities between the current models in the Wouxun S-Series.

    Wouxun S-Series Radio Comparison
    Model KG-S72C KG-S74A KG-S84B KG-S86B KG-S88G
    Receiver Type Superheterodyne Superheterodyne Superheterodyne Superheterodyne Superheterodyne
    Radio Service CB Aviation Business Business GMRS
    FCC ID WVTWOUXUN29 2A6DTET001 WVTWOUXUN30 WVTWOUXUN30 WVTWOUXUN28
    Maximum Transmit Power 2W AM/4W FM 6W (PEP) 2W 2W 5W
    Custom Channels 400 400 256 400 400
    Band CB VHF UHF UHF UHF
    Transmit Frequencies CB
    (Assigned)
    Avionic Business
    (Assigned)
    Business
    (Assigned)
    GMRS
    (Assigned)
    Receive Frequencies 26-27 MHz 118-137 MHz 400-480 MHz 400-480 MHz 400-480 MHz
    Modulation AM/FM AM FM FM FM
    NOAA Weather Channels
    NOAA Weather Alerts
    Weather Alert Notifications 5
    Privacy Codes 50 CTCSS/105 DCS (FM) 50 CTCSS/105 DCS 50 CTCSS/105 DCS 50 CTCSS/105 DCS
    Keypad 4-Key Full 4-Key Full DTMF
    Programmable Side Keys 2 2 2 2 2
    Programmable Top Key
    Backlit LCD Display
    Display Channel Name, Number or Frequency
    Custom Display Messages
    Channel Scan
    Priority Channel Scan
    CTCSS/DCS Tone Scan
    Favorite Channels
    Wide/Narrow Bandwidth Selectable
    Busy Channel Lockout
    VOX
    English Voice Guide
    Button Beep
    Roger Beep
    Tune Specific Frequencies Directly
    (Frequency Mode)
    Emergency Frequency
    High/Low Power Selectable
    Monitor Function
    Recall
    Compander
    Descrambler
    DTMF Encode/Decode
    Display Backlight
    Power-On Display Message
    Battery Meter
    Low Battery Alert
    Power Saver
    Timeout Timer
    Stopwatch Timer
    Built-in Flashlight
    Built-in Front Speaker
    2-pin Audio Connector (K1)
    USB-C Charging Port
    Antenna Connector (K1) SMA M SMA M SMA M SMA M SMA M
    PC Programmable
    Lithium-ion Battery BLO-021
    2000 mAh
    BLO-021
    2000 mAh
    BLO-021
    2000 mAh
    BLO-021
    2000 mAh
    BLO-021
    2000 mAh
    Dust/Water Protection IP65 IP67 IP65 IP65 IP67
    Dimensions (inches/millimeters) 4.53 × 2.14 × 1.36 (in)/
    115 × 54.3 × 34.6 (mm)
    4.53 × 2.14 × 1.36 (in)/
    115 × 54.3 × 34.6 (mm)
    4.53 × 2.14 × 1.36 (in)/
    115 × 54.3 × 34.6 (mm)
    4.53 × 2.14 × 1.36 (in)/
    115 × 54.3 × 34.6 (mm)
    4.53 × 2.14 × 1.36 (in)/
    115 × 54.3 × 34.6 (mm)
    Weight (ounces/grams) 8.32oz / 236g 8.40oz / 238g 7.94oz / 225g 8.32oz / 236g 8.40oz / 238g
    Antenna Connector Type SMA Male (Standard) SMA Male (Standard) SMA Male (Standard) SMA Male (Standard) SMA Male (Standard)
    Warranty 1 Year 1 Year 1 Year 1 Year 1 Year

    *Note: The features highlighted in green are only available on the aviation model.

  • What is the actual wattage of a Motorola Talkabout radio?

    Motorola Talkabout T265 Two Way RadiosSome manufacturers of consumer FRS walkie talkies market their products based on the range in miles. We are often asked about the actual wattage of these radios, because these manufacturers don't usually include this information on their products. There is an obvious reason for this. It isn't impressive. In fact, if they did so, many consumers may be somewhat disappointed, because the wattage on these products is usually on the low end, often much lower than the maximum allowable wattage for FRS. In many cases, it doesn't even approach the >maximum allowed on the low power 467 MHz FRS frequencies, and that's when the radio is operating at high power!

    It's even more ironic when you consider that, until the Part 95 Reform of 2017, Most of these were FRS and GMRS hybrid radios that were often assumed to operate at the maximum wattage allowed on GMRS handhelds. The maximum allowable power on GMRS channels at the time was 5 watts. The power output for the GMRS, and hence the overall range, was actually very weak on nearly all of these models, which is why many licensed GMRS users preferred business radios over the consumer models.

    The Great Reform changed all that. In 2017 the FCC separated the FRS/GMRS hybrids, allowing the channels previously reserved for GMRS to be shared with FRS as well, and while the seven 467 MHz FRS channels remained at one-half watt (0.5W) max, it raised the maximum allowable wattage on the now fifteen 462 MHz FRS channels to 2 watts.

    This was welcome news to almost all users, since it encouraged manufacturers to make dedicated GMRS radios with higher wattage, and gave FRS users more power and greater range. In essence, what the reform did was re-classify hybrid "bubble pack" radios that were under 2 watts as license-free FRS radios. With the exception of a couple of Midland handheld radios that were above 2 watts, nearly all of the hybrid radios were well under that 2 watt limit, and therefore became FRS radios.

    So, the manufacturers could now sell all of these hybrid radios, which previously required a license to operate on the GMRS channels, as FRS only radios that were "license-free". One would think that this would provide more opportunity and innovation with the introduction of 2 watt FRS radios, since that became the new limit. But that's not what happened, at least, not right away. With the exception of Wouxun, which jumped right on this one with the full 2 watt KG-805F FRS radio, a majority of the manufacturers chose to stick with their current lineup and simply re-label them all as FRS.

    One of these manufacturers was Motorola. Although they did apply wattage changes to a few models, for the most part it was business as usual. Their Talkabout line is a prime example of how low the power can go on the high power setting. And Motorola is not the only one. Other bubble pack manufacturers did the same.

    Many consumers mistakenly assume that because it is an FRS radio advertised at 35 miles range or more, it operates at the full 2 watts. But that's not quite accurate. And this is why we receive queries and complaints that their Motorola, Cobra or Uniden radios can't make it a couple of miles, or sometimes even a couple of city blocks. It's because these radios are not a full 2 watts, and some are only capable of operating at a fraction of what the FCC allows. A few are not much more powerful than the little walkie talkies sold as toys.

    Yet, you'll often find them in use in some mom and pop retail stores, restaurants, schools and churches.

    Just how powerful aren't they? The chart below lists some popular Motorola Talkabout radios, their advertised range and their actual wattage, according to the official documentation on file at the FCC.

    It is important to note that a few of the radios listed in the following chart have "inverted" wattages, meaning that 467 MHz channels may actually have higher wattage than the 462 MHz channels! Strange, indeed.

    Motorola Talkabout Wattage Comparison
    Model FCC
    ID
    Range* Adjustable
    Power
    Low
    Wattage
    Max
    Wattage
    Motorola TALKABOUT T100 Two Way Radios
    T100
    AZ489FT4930 16 Miles 0.19W 0.2W**
    Motorola TALKABOUT T107 Two Way Radios
    T107
    AZ489FT4930 16 Miles 0.19W 0.2W**
    Motorola TALKABOUT T200 Two Way Radios
    T200
    AZ489FT4928 20 Miles 0.411W 0.47W**
    Motorola TALKABOUT T260 Two Way Radios
    T260
    AZ489FT4929 25 Miles 0.4W 0.8W
    Motorola Talkabout T265 Two Way Radios
    T265
    AZ489FT4929 25 Miles 0.4W 0.8W
    Motorola TALKABOUT T280 Two Way Radios
    T280
    AZ489FT4929 25 Miles 0.4W 0.8W
    Motorola TALKABOUT T400 Two Way Radios
    T400
    AZ489FT4924 35 Miles 0.48W 1.71W
    Motorola TALKABOUT T402 Two Way Radios
    T402
    AZ489FT4924 35 Miles 0.48W 1.71W
    Motorola TALKABOUT T460 Two Way Radios
    T460
    AZ489FT4924 35 Miles 0.48W 1.71W
    Motorola TALKABOUT T465 Two Way Radios
    T465
    AZ489FT4924 35 Miles 0.48W 1.71W
    Motorola TALKABOUT T480 Two Way Radio
    T480
    AZ489FT4925 35 Miles 0.37W 1.39W
    Motorola TALKABOUT T600 Two Way Radios
    T600
    AZ489FT4927 35 Miles 0.4W 1.3W
    Motorola TALKABOUT T605 Two Way Radios
    T605
    AZ489FT4927 35 Miles 0.4W 1.3W
    Motorola Talkabout T800 Two Way Radio w/ App Support
    T800
    AZ489FT4947 35 Miles 0.4W 0.75W

    *Motorola advertises FRS/GMRS radio range in miles, however your actual range may vary as it depends on a number of variables. For more information watch our short video Radio 101 - The Truth About FRS/GMRS Two Way Radio Range.
    **The "low power" 467 MHz channels have the higher wattage.

  • Wouxun KG-935G Plus programming and menu options

    Wouxun KG-935G Plus Channel WizardThe Wouxun KG-935G Plus is an extremely powerful and versatile portable handheld GMRS radio designed for power users who want maximum performance coupled with maximum functionality. Although it is nearly identical to the original KG-935G in outward appearance and core functions, it includes significant upgrades to existing features and introduces new ones, several of which are also new to two way radios altogether.

    As with the original, the 935G Plus transmits on the 15 high powered GMRS simplex channels and the 8 repeater channels at up to 5.5 watts. It can also transmit on Channels 8-14, albeit at low output power, in compliance with FCC rules. This is not one of those minimum wattage, consumer grade, "bubble pack" GMRS walkie talkies found on the shelf at a big box store. The KG-935G Plus is a professional grade, portable handheld GMRS powerhouse.

    KG-935G Plus Key Features

    • 22 Simplex GMRS Channels
    • 8 GMRS Repeater Channels
    • 136-174.995 MHz (Receive Only)
    • 400-479.995 MHz (Receive Only)
    • FM Radio
    • NOAA weather Channels
    • NOAA weather alerts
    • Up to 5.5W Maximum Transmit Power
    • High/Med/Low TX Power Levels
    • 5 weather alert notifications
    • Tune Specific Frequencies Directly (Frequency Mode)
    • Simultaneous Dual Channel Receive
    • Repeater Capable
    • Standard and Non-Standard CTCSS/DCS Tones
    • Split CTCSS/DCS Tone Support
    • Channel Scan
    • Priority Scan
    • CTCSS/DCS Tone Scan
    • Scan Group Support
    • Wide/Narrow Bandwidth Selectable
    • Large Color Backlit LCD Dual Display
    • 10 Display Color Theme Options
    • Channel Name, Number or Frequency Display
    • Incoming Caller ID Display
    • Custom Display Messages
    • Voltage Display
    • Backlit Keypad
    • Companding
    • Descrambler
    • DTMF Encoding and Decoding
    • Group Call, All Call and Selective Call
    • Timeout Timer
    • Audible Button Beeps
    • English Voice Prompts
    • Transmit Overtime Alarm
    • Scan Add/Delete
    • Busy Channel Lockout
    • Battery Meter
    • Low Battery Alert
    • Power Saver
    • VOX
    • 2 Programmable Function Keys
    • PF Quick Key Guide
    • Channel Wizard
    • Stopwatch Timer
    • Keypad Lock
    • Built-in Flashlight
    • Li-Ion Battery Pack (2600mAh)
    • Rechargeable Battery Included
    • Battery Charger
    • USB-C Charging Port on Battery
    • IP66 Waterproof
    • PC Programming Support
    • Drop-In Charge Capable
    • Audio Accessory Connector
    • Factory Reset

    Programming the KG-935G Plus
    As it is with all Wouxun GMRS radios we carry, the KG-935G Plus is fully programmable from a PC using a programming cable and the Wouxun KG-935G Plus programming software or directly from the keypad of the radio itself. In fact, while customizing the original KG-935G from the keypad is fairly easy overall, The KG-935G+ is now even easier, thanks to a brand new feature introduced with this model - the Channel Wizard.

    Direct from the radio
    If you already know how to program new channels and frequencies into the Wouxun KG-935G or another Wouxun radio, you're all set. If not, or if you are new to programming radios altogether, no worries. The KG-935G Plus owners manual is specifically written to get you up to speed quickly. The manual is written in plain English with instructions that are easy to understand. To make it even easier and faster, you can use the Channel Wizard.

    Using the Channel Wizard
    The KG-935G Plus has a built in wizard to make is super easy to program a channel into the radio. Called the Channel Wizard, this is a new function that allows you to quickly and easily program a new channel or modify an existing channel direct from the keypad of the radio itself. With the Channel Wizard, you can add or clone new channels into the radio in mere seconds. You can also change the settings in any existing channel. The wizard lets you do all of this without scrolling through the menu to find and set each individual channel option, and without the need for programming software.

    There are two ways to access the Channel Wizard. The standard method is to hold the MENU button down for 3 seconds. This will take you directly into it. The second method is to press [MENU] + [6] + [1] and the screen will display: CH-WIZARD. There are ten menu functions in the Channel Wizard, each with their own sub-menu. Go to the first menu item and press [MENU] to enter its sub-menu. Use the [UP] and [DOWN] arrow keys to choose the option you want from that sub-menu, then press [MENU] to enter your choice. This will take you back to the Channel Wizard menu to go to the next or previous Channel Wizard menu function.

    The last Channel Wizard menu function is [SAVE-MODE]. You must choose this function to save your channel settings and add, clone or save your channel to the radio. You can choose to save your channel and create another channel or save the channel and exit the Channel Wizard.

    Of course, you can opt to enter and save a channel or frequency independently through the individual menu items instead. While not as fast as the Channel Wizard, this method does allow you tweak a specific channel setting as needed.

    The KG-935G Plus menu consists of 62 items. Default settings are bold.

    Menu # Menu Item Description Option
    01 SQUELCH Squelch settings 1 to 9|5
    02 TX-POWER Output power HIGH|MED|LOW|Varies
    03 W/N Wide/Narrow bandwidth settings NARR (12.5k)|WIDE (25k)|Varies
    04* REPEATER Repeater OFF|ON
    05 BRT-ACTV Active Backlight 1-10|8
    06 BRT-STBY Standby Backlight OFF|1-10
    07* WX-ALERT Weather Alert ON|OFF
    08 BAT-SAVE Battery Saver ON|OFF
    09 RX-CTCSS Receive CTCSS Tone OFF|1-50
    10 TX-CTCSS Transmit CTCSS Tone OFF|1-50
    11 RX-DCS Receive DCS Code OFF|1-105 +/-
    12 TX-DCS Transmit DCS Code OFF|1-105 +/-
    13 THEME Display Theme WHITE-1|WHITE-2|BLACK-1|BLACK-2|COOL|RAIN|NotARubi|SKY|BTWR|CANDY
    14 BACK-LT Backlight Timeout ALWAYS OFF|1-20S|8S|ALWAYS ON
    15 SCANMODE Scan Mode TO|CO|SE
    16 SCANGRP-A Scan Group A ALL|1-10
    17 SCANGRP-B Scan Group B ALL|1-10
    18 PRI-SCAN Priority Scan ON|OFF
    19 PRI-CH Priority Channel 999 Channels|CH:01
    20 SCAN-ADD Scan Add/Delete ON|OFF
    21 TONE-SCAN CTCSS/DCS Scanning NONE|CTCSS|DCS
    22 TONE-SAVE CTCSS/DCS Tone Save Options RX|TX|ALL
    23 WX-NOTIFY Weather Alert Notification Setting WEATHER|ICON-ONLY|TONE|FLASH|TONE+FLASH
    24* STEP Step frequency settings 2.5K to 100.0K|5K
    25 ROGER Roger Beep OFF|BOT|EOT|BOTH
    26 TOT Transmit Overtime Timer 15-900 sec (15 second increments)|60
    27 TOA Transmit Overtime Alarm OFF|1-10 seconds|5
    28 VOX Voice Activated Transmit OFF|1-10 (Level)
    29 VOICE Voice Guide OFF|ON
    30 BEEP Button Beeps ON|OFF
    31 BUSY-LOCK Busy Channel Lockout ON|OFF
    32 VOLTAGE Displays Battery Voltage None
    33 BAT-TYPE Battery Level Display Type ICON|VOLTAGE|PERCENT
    34 PF1-SHORT Side Key PF1 Short Press Assignment UNDEF|BACKLIGHT|FAVORITE|BRIGHT+|DCS-SCAN|CTC-SCAN|REVERSE|TALK-A|WEATHER|STROBE|MONI|FM-RADIO|SOS|ALARM|FLASHLIGHT|SCAN
    35 PF1-LONG Side Key PF1 Long Press Assignment UNDEF|BACKLIGHT|FAVORITE|BRIGHT+|DCS-SCAN|CTC-SCAN|REVERSE|TALK-A|WEATHER|STROBE|MONI|FM-RADIO|SOS|ALARM|FLASHLIGHT|SCAN|SELEC CALL|FRQ2-PTT
    36 PF2-SHORT Side Key PF2 Short Press Assignment UNDEF|BACKLIGHT|FAVORITE|BRIGHT+|DCS-SCAN|CTC-SCAN|REVERSE|TALK-A|WEATHER|STROBE|MONI|FM-RADIO|SOS|ALARM|FLASHLIGHT|SCAN
    37 PF2-LONG Side Key PF2 Long Press Assignment UNDEF|BACKLIGHT|FAVORITE|BRIGHT+|DCS-SCAN|CTC-SCAN|REVERSE|TALK-A|WEATHER|STROBE|MONI|FM-RADIO|SOS|ALARM|FLASHLIGHT|SCAN|SELEC CALL|FRQ2-PTT
    38 SMUTESET Secondary Area Mute Setting OFF|TX|RX|TX+RX
    39 WORK-MODE Work Mode settings CH-NAME|FREQUENCY|CH-NUMBER|CH-FREQ
    40** CH-NAME Edit a channel name Name***
    41 CH-FAV Favorite Channel OFF|ON
    42 CH-ADD Add Memory Channel 999 channels
    43 CH-DELETE Delete Memory Channel 999 channels
    44 DESCRAMBL Descrambler OFF|SCRAM 1-8
    45 COMPANDER Compander ON|OFF
    46 SP-MUTE Speaker Mute QT|QT+DTMF|QT*DTMF
    47 ANI-SW Radio ID On/Off ON|OFF
    48 ANI-EDIT Edit Radio ID 0-9|101
    49 SIDETONE Sidetone Setting OFF|DTMF|ANI|DTMF+ANI
    50 ALERT Tone Alert 1750Hz|2100Hz|1000Hz|1450Hz
    51 PTT-DLY PTT-Delay 100~3000ms|300ms
    52 PTT-ID Radio ID Setting BOT|EOT|BOTH
    53 RING Ring Time OFF|1-10 seconds|3
    54 CALLCODE Call Code 1-20 Groups|NONE
    55 RPT-TONE Squelch Tone OFF|ON
    56 TIMER Stopwatch Timer ON|OFF
    57 SIM-RX Simultaneous Receive OFF|ON
    58 AUTOLOCK Auto Lock OFF|ON
    59 PONMSG Power On Message BITMAP|BATT-V
    60 FM-MEM FM Radio Memory MEMORY|RECALL
    61 CH-WIZARD Channel Wizard NONE
    54 RESET Factory Reset VFO|ALL

    Note: *The menu items in yellow are available in Frequency mode only.
    **The menu item in green is available in Channel mode only.

    Programming with software
    The KG-935G Plus uses the same Wouxun PCO-001 USB programming cable that works with the KG-805G, KG-905G and KG-935G. Refer to the cable driver installation instructions for more information.

    Of course, the Wouxun KG-935G Plus programming software is specific to this radio and is currently available for Windows PCs only. The programming software is located under the Downloads tab on the Wouxun KG-935G Plus product page at Buy Two Way Radios.

    KG-935G Plus Operation
    The KG-935G Plus operates in much the same way as other Wouxun GMRS handheld radios with full keypads, displays and menus. If you already have a KG-935G or other Wouxun radio that is field configurable, operating the KG-935G Plus is about the same. Although some keys on the keypad my be different in label and function from some of the other models, they are not difficult to to use once you understand what they do.

    The keys on the keypad and their primary functions are listed below:

    Button Operation
    MENU Enter program menu|choose/set/save menu option
    UP Key Select next channel/frequency|Select menu option
    DOWN Key Select previous channel/frequency|Select menu option
    EXIT Short Press: Exit menu/cancel
    Long Press: Current PF Key Assignments
    1-SQL Squelch menu hotkey
    2-PWR Power menu hotkey
    3-W/N Bandwidth menu hotkey
    4-RPT Repeater menu hotkey
    5-BRT-A Active Backlight menu hotkey
    6-BRT-S Standby Backlight menu hotkey
    7-W-ALT Weather Alert menu hotkey
    8-SAVE Battery Saver menu hotkey
    9-CTCSS RX CTCSS Tone menu hotkey
    0-(None) No hotkey function
    *-SCAN Scan/Reverse Frequency key
    #-LOCK Keypad lock key
    AREA Short Press: Switch primary (A/B) areas
    Long Press: Weather Mode
    MODE Switch Channel/Frequency mode
    TDR Switch single/dual display mode

    The Wouxun KG-935G Plus takes the GMRS to a whole new level. With the addition of new features such as the Channel Wizard, USB-C charging, and PF Key Quick Guide, this transceiver offers even more flexibility, programmability and ease of use than the original KG-935G to create the ultimate Wouxun GMRS experience -so far.

  • Wouxun KG-935G and KG-935G Plus Feature Comparison

    Wouxun KG-935G and KG-935G Plus ComparisonWouxun just added another Plus model in its line of GMRS radios with the introduction of the KG-935G Plus. While it does retain all of the key features of the original KG-935G, this new version adds more than just "Plus" to the name. It's a major upgrade.

    Just how major is it? Well, there are so many updates and new features, we had to create a chart for a visual comparison between the two models. And here it is. The following chart compares the differences in functionality between the original KG-935G and the KG-935G Plus.

    KG-935G/KG-935G Plus Comparison Chart

    Wouxun KG-935G and KG-935G Plus Comparison
    Model KG-935G KG-935G Plus
    Receiver Type Direct Conversion Direct Conversion
    Service GMRS GMRS
    Maximum Transmit Power 5.5W 5.5W
    GMRS Channels 30 30
    GMRS Repeater Channels
    Custom Channels 999 999
    400-470 MHz UHF Receive
    136-174 MHz VHF Receive
    FM Radio
    NOAA Weather Channels
    NOAA Weather Alerts
    Weather Alert Notifications 1 5
    Privacy Codes 50 CTCSS/105 DCS 50 CTCSS/105 DCS
    Standard/Non Standard CTCSS/DCS
    Split CTCSS/DCS Tone Support
    Full DTMF Keypad
    Programmable Side Keys 2 2
    Full Color LCD Display
    Color Display Themes 4 10
    Dual Display Mode
    Display Channel Name, Number or Frequency
    Custom Display Messages 1 2
    Incoming Caller ID Display
    PF Key Quick Guide
    Channel Scan
    Priority Channel Scan
    CTCSS/DCS Tone Scan
    Scan Group Support
    Favorite Channels
    Simultaneous Dual Channel Receive
    Channel Wizard
    Group Call/All Call/Select Call
    Wide/Narrow Bandwidth Selectable
    Busy Channel Lockout
    VOX
    English Voice Guide
    Button Beep
    Tune Specific Frequencies Directly
    (Frequency Mode)
    Call ID
    SOS Function
    High/Med/Low Power Selectable
    Monitor Function
    Compander
    Descrambler
    DTMF Encode/Decode
    Display Backlight
    Bright+ Display Backlight Control
    Power-On Display Message
    Battery Meter
    Selectable Battery Meter
    Low Battery Alert
    Power Saver
    Timeout Timer
    Stopwatch Timer
    Built-in Flashlight
    Built-in Front Speaker
    2-pin Audio Connector (K1)
    PC Programmable
    Lithium-ion Battery BLO-016 3200 mAh BLO-016-USB-C 2600 mAh USB-C
    Dust/Water Protection IP66 IP66
    Dimensions (inches/millimeters) 4.9 × 2.42 × 1.33(in) / 124.5 × 61.49 × 33.88(mm) 4.9 × 2.42 × 1.33(in) / 124.5 × 61.49 × 33.88(mm)
    Weight (ounces/grams) 17.28oz / 490g 17.28oz / 490g
    Antenna Connector Type SMA Male (Standard) SMA Male (Standard)
    Warranty 1 Year 1 Year

    *Note: The feature highlighted in violet is an upgrade to an existing feature in the Plus.
    The feature highlighted in green is a new feature in the Plus.

  • Types of Audio Connectors for Handheld Two Way Radios

    XLT Audio ConnectorsTwo way radios are generally considered easy to operate for point-to-point communications. Just push the button to talk, and release to listen. Yet in spite of this simplicity, there are some aspects to these devices that seem somewhat confusing or complicated to manage. A prime example of this is in regards to the audio accessories, or more specifically, the lack of cross-compatibility between the plugs, ports and different connectors. We are often asked whether the earpieces, headsets and speaker microphones used for one brand of walkie talkie will work with radios from other brands. After all, many other types of audio products follow a set of standards for plugs, jacks and connections, so why not the radios? Aren't audio connectors for radio accessories universally compatible?

    If only it were that simple. However, such is not the case.

    Many two way radio manufacturers have their own proprietary connector set for their products. Some follow their own standard across their entire product lines, and others, such as Icom and Motorola, use several different types of connectors that are proprietary to specific model tiers and series.

    The good news is that this is beginning to change. Thanks in large part to overseas manufacturers, most notably those in China, a standard of sorts began to emerge during the last decade, and its adoption continues to gain serious momentum. The standard? This is the 2-pin Kenwood, or K1 style connector.

    Many radio brands such as Baofeng, TYT and Wouxun are now using the K1 connector as the de facto standard for audio accessories. This allows greater flexibility, interoperability and choice for consumers who want to upgrade to a new portable handheld radio, but don't want the expense and hassle of having to toss out all their old earpieces and replace them with new ones. Instead of jamming them into the junk drawer or lobbing them into a landfill, they can now mix and match existing headsets, speaker mics and other accessories with their latest transceiver purchase.

    But what about the other name brand manufacturers? Are there adapters or other options that will allow someone to convert one type or brand of audio accessory connector to another?

    We get this question a lot. Unfortunately, with few exceptions, the answer is a very disappointing no.

    So, how do you determine what audio accessories are compatible with your radio? How can you identify the type of audio connector your radio uses and how can you tell all the different plugs and ports apart from one another?

    The chart below lists common connector types and the radios that are compatible with them. Although it was created to cross-reference XLT brand audio accessories, it can be used to help identify connector types for other accessory brands as well.

    Click on the connector part number in the chart below to view a sample image of the connector type.

    Handheld Two Way Radio Audio Connector Types
    XLT Part Number Radio Models
    C1 Cobra: Cobra FRS/GMRS Radios
    Garmin: Garmin 110, 120, 130, 530, 610, 650, 655t
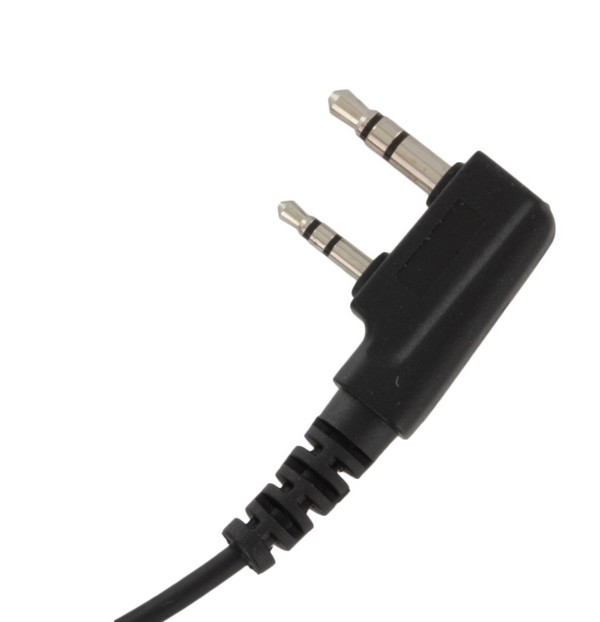
    K1 Baofeng: BF-F8+, BF-F9, UV-5R, UV-B6, UV-82
    Blackbox: Blackbox Base Station
    HYT/HYTERA: TC620, TC700EX
    Kenwood: TK-208, TK-220, TK-240, TK-240D, TK-248, TK-250, TK-260, TK-260G, TK-270, TK-270G, TK-308, TK-340, TK-340D, TK-348, TK-350, TK-353, TK-360, TK-360G, TK-370, TK-370G, TK-372G, TK-430, TK-431
    TK-2100 (Pro Talk), 2102 (Pro Power), 2130 (Pro Talk XLS), 2160, TK-2212, TH-22AT, TH-77A, TH-78A, TH-D7A(G), TH-235A, TH-28A, TH-42AT, TH-48A, TH-G71A, TH-F6, TH-F6A, TH-K2AT, TK-
    320, TK-373, TK-2000, TK-2170, TK-2200, TK-2202, TK-2300, TK-2360, TK-3000, TK-3201, TK-3170, TK-3173, TK-3200, TK-3202, TK-3212, TK-3230, TK-3230DX, TK-3300, TK-3302, TK-3350, TK-3360, TK-3202
    TK-3100 (Pro Talk), TK-3101 (Free Talk XL), TK-3102 (Pro Power), TK-2400, TK-2402, TK-3400, TK-3402,
    TK-3130 (Pro Talk XLS), 3131 (Free Talk XLS), 3160, TK-3230 (Pro Talk XLS), TK-D340U, NX-240V16P, NX-340U16P, NX-240V16P, NX-340U16P, NX-P1200AV, NX-P1200NV, NX-P1202AV, NX-P1300AU, NX-P1300NU, NX-P1302AU
    Leixen: LX-928
    Midland: BizTalk BR200
    Olympia: P324
    Relm: RPU416, RPV516, RPU499, RPV599X, RPV516A, RPV599A Plus, RPU416A, RPU499A Plus, RPU4200
    TYT: MD-280, MD-380, MD-390, MD-UV380, TH-350, TH-UV88
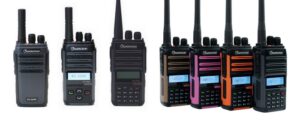
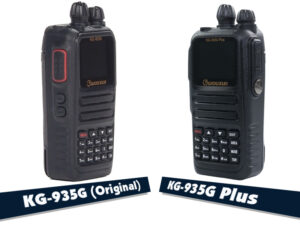
    Wouxun: KG-805, KG-805F, KG-805FS, KG-805G, KG-805M, KG-824B, KG-826B, KG-905G, KG-935G, KG-935G Plus, KG-S72C, KG-S84B, KG-S86B, KG-S88G, KG-D901, KG-UV6D, KG-UV6D PRO, KG-UV7D, KG-UV8D, KG-UV8D Plus, KG-UV8E, KG-UV8H, KG-UV899, KG-UV9D, KG-UV9D Plus, KG-UV9D MATE, KG-UV9P, KG-UVD1P, KG-UVN1
    K2 Kenwood: TK-190, TK-280, TK-290, TK-380, TK-385, TK-390, TK-480, TK-481, TK-2140, TK-3140, TK-2180, TK-3148, TK-3180, TK-3212, TK-4180, TK-5210, TK-5400, TK-5410, TK-5220, TK-5310, TK-5320, TK-5410, TK-5420, Nexedge NX-200, NX-210, NX-300, NX-410, NX-3200, NX-3300, NX-5200, NX-5300, NX-5400
    K3 Kenwood: PKT-23
    K4 Kenwood: NX-P500
    M1 Bearcom: BC120
    Blackbox: BlackBox , Blackbox+
    HYT/Hytera: HYT TC500, TC518 OBR, TC600, TC610, TC700
    Midland: BizTalk MB400
    Motorola: BC10, BC120, BC130, MAG ONE/BPR40, BC90, CLS Series, CLS1110, CLS1410, CP125, CP185, CP88, CP100, CP100d, CP150, CP200, CP200d, CT150, CT250, CT450, CT450LS, DLR1020, DLR1060, DTR Series, DTR410, DTR550, GP68, GP88, GP280, GP300, GP308, GP350 (requires Motorola adapter HLN9482), GP2000, GTI, GTX, LTS2000, P040, P080, P110, P1215, P1225LS, PR400, PRO3150, RDU2020, RDU2080d, RDU4100, RDU4160, RDV2020, RDV2080d, RDV5100, RMU2040, RMU2080, RMU2080d, RMV2080, RMM2050, SP10, SP21, SP50, XTN446, XTN500, XTN600, XV1100, XV2100, XU1100, XU2100, XU2600, VL50, VL130
    RCA: BR-250
    Relm: RP6500
    Tekk: XU100, XV100, XU1000, XV1000
    M3 Motorola: EX500, EX600, GL2000, GP328Plus, GP338Plus, GP344, GP388, PRO5150elite, EX560XLS
    TYT: MD-2017
    M4 HYT/HYTERA: TC980
    Motorola: MTP700, GP1280, GP140, GP320, GP328, GP329, GP338, GP339, GP340, GP360, GP380, GP640, GP650, GP680, HT1250, HT1250LS, HT1550, HT1550XLS, HT750, MTX8250,
    MTX8250LS, MTX850, MTX850LS, MTX9250, MTX950, PRO5150, PRO5350, PRO5450, PRO5550, PRO5750, PRO7150, PRO7350, PRO7450, PRO7550, PRO9150, PTX700, PTX760, PTX780, MTX950, PR860, PRO7750, SABRE radio series
    M5 EF Johnson: 5000, 5100, 51LT ES, 51SL ES Series, 7700 Series, AN/PRC 127EFJ, Avenger 8100 Series, Multi-Net Ascend ES Series, Viking VP600, VP900, Viking CK8500 Series, Viking Fire
    Motorola: GP900, GP9000, HT1000, JEDI, JT1000, MT1500, MT2000, MTS2000, MTX8000, MTX838, MTX900, MTX960, MTX9000, MTX-LS, PM1500, PR1500, XTS1500, XTS2500, XTS3000/Astro, XTS3000, XTS3500, XTS5000
    M6 Cobra: FRS 5512, 5522, T5800, 5820, 6200, 6210, 6220, 6250, 6300, 6320, 6400, T7200 series, FR50, FR60
    DeWALT: DXFRS300, DXFRS800
    HYT/HYTERA: TC1688, TC320, TC310, TC310 OBR
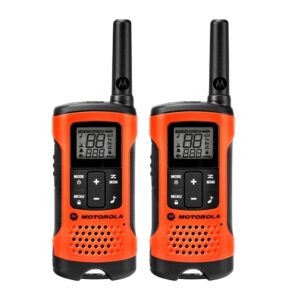
    Motorola: Single Pin for FRS/GMS/GMRS "talkabout" radios, T200, T260, T270, T280, T289, T400, T460, T465, T480, T600, T605, T800, T5100, T5200, T5300, T5320, T5400, T5410, T5420, T6000 series, T8000 series, T9000 series, and EM, FV, MB, MC, MD, MH, MJ, MR, MT, SX series radios.
    Olympia: Single Pin for FRS/GMRS radios, R100, R300, R500.
    TriSquare: TriSquare TSX series
    M7 Midland: STP404A
    Motorola: TRBO, XPR6300, XPR6500, XPR6350, XPR6380, XPR6550, XPR6580 and APX7000 Series
    M12 Motorola: CLP1010, CLP1040, CLP1060 Series
    ML1 Midland: Works with all Midland FRS/GMRS radios such as the Midland G, GXT, and LXT series radios.
    President: RANDY FCC radio
    S2 Midland: Works with all Midland FRS/GMRS radios such as the Midland G, GXT, and LXT series radios. Note: cable comes straight out of the back of the connector.
    President: RANDY FCC radio
    S6 Icom: IC-F3G, IC-F3GS, IC-F4G, IC-F4GS, IC-F11, IC-F21, IC-F14, IC-F14S, IC-F24, IC-F24S, IC-F31, ICF33G, IC-F43G, IC-F43TR, BC100, IC-F1000, IC-F2000, IC-F1000D, IC-F2000D, IC-F3001, IC-F3011, IC-F3021, IC-F3021S, IC-F3021T, IC-F3031, IC-F3210D, IC-F4210D, IC-F4031, IC-F3101D, IC-F4101D, ICF4001, IC-F4011, IC-F4021, IC-F4021S, IC-F4021T
    S8 Icom: IC-F30G, IC-F30GT, IC-F30GS, IC-F31, IC-F31GS, IC-F31GT, IC-F40G, ICF40GS, IC-F40GT, IC-F41G, IC-F50, IC-F50V, IC-F51, IC-F60, IC-F60V, IC-F61, F70, F80, M87, M88, IC-F3061 Series, IC-F4061 Series, IC-F3161 Series, ICF4161 Series
    T1 TYT: TH-9600
    Y4 Vertex Standard: Two mounting screws - eVerge EVX-261, EVX-531, EVX-534, EVX-539, VX130, VX160, VX180, VX210, VX210A, VX-261, VX-264, VX300, VX400, VX410, VX420, VX230, VX231, VX350, VX351, VX354, VX451, VX454, VX459
    Y6 Vertex Standard: eVerge EVX-S24
  • Why your radio programming cable may not work

    Programming Cable and Driver CDProgramming your two way radio from a computer is one thing. Installing the equipment needed to do it can be something else entirely. Sometimes the process is relatively simple, other times it becomes deceptively complicated. Either way, the set up of any radio programming station typically involves three primary components: a computer, the software to program your specific make and model of radio, and a cable to connect the radio to the computer.

    The first two items are not that complicated to set up. Chances are your computer, especially if it is a Microsoft Windows based PC, is probably already good to go. The programming software is usually provided by the manufacturer of the radio, and although it may not always be free, once you have it, the installation is usually rather straightforward.

    Then there is the programming cable. It's a critical component of the whole system because it is the direct, wired data link between the computer and the radio to be programmed. The basic concept seems intuitive enough. Plug one end of the cable into the computer, and the other end into the radio. Everything is connected and ready to go. Simple, right?

    Well, if you have something like the XLT Painless Programming Cable, it usually is. In fact, this cable is about as simple and easy as it gets.

    For many other programming cables, it's not quite that simple or easy. Sometimes the installation of a programming cable can be a project in and of itself. To understand why, we must first understand how the cable really works.

    Years ago, radio programming cables typically had a 9-pin DE-9 (aka DB-9) serial connector to interface with an RS-232 serial port on the back of the computer. Many of these cables were proprietary and required a specific driver installed to communicate or "drive" the hardware and to move the data through the port and across the cable between the radio and the PC.

    The introduction of the Universal Serial Bus changed everything. More commonly known by its acronym  USB, this connector type created a new standard for electronic devices that has, true to its name, become universal. The USB connector was intended to replace the myriad of other larger, bulkier and somewhat proprietary connectors across the market with one simple, unifying connector type that could be used to connect just about any device to any other. So far, it seems to have accomplished just that.

    Over time, USB replaced the RS-232 serial port as the standard physical connection between the two way radio and the PC. However, the USB plug is on the PC end. While some business radios still use programming cables with a physical RS-232 connector designed to plug directly into a computer equipped with a serial port, most cables today are USB.

    Most analog and digital radios have a single, dual or multi-pin audio port that doubles as the data port. To properly create the data connection, the USB programming cables connecting to these radios typically use a circuit or chip to emulate a serial connection between the computer and the radio.

    The two most common chips used in these cables are Prolific and FTDI. Each requires the installation of its own proprietary driver in order for the computer to properly recognize and communicate with the programming cable.

    Although it is not within the scope of this article to get into the technical aspects of these technologies, it is important to know that they are quite different from one another to better understand why installing a USB programming cable can sometimes be problematic.

    In other words, if the correct hardware driver is not used or is not properly installed, the programming cable simply won't work.

    If your programming cable won't work, it's usually due to one (or more) of following reasons:

    • The cable contains a counterfeit chip. This is a common issue with cheap, sub $10 cables purchased from overseas resellers and sold on eBay or Amazon.
    • The programming cable is not compatible with your radio. This is common when using both analog and digital radios, as they often require different types of programming cables.
    • The provided driver is too old or incompatible with your version of the operating system (usually Windows).
    • Your operating system (usually Windows again) rejected the driver and installed one of its own.
    • Your operating system (usually Windows, of course) has a configuration issue or conflict with the USB port or system bus on your computer.
    • There is a hardware conflict with your USB port or system bus.
    • The driver was installed incorrectly. There are often specific procedures for installation of specialized USB drivers, and if not performed in the correct sequence, it can cause the installation to fail.
    • Corrupt USB driver. This will require total removal and re-installation of the driver.
    • The installation instructions were not followed correctly or at all.

    As you can tell from this list, the reasons can be many and varied. However, the most common support call we receive regarding problems with programming cables is the very last item on the list. While it is certainly possible to receive a faulty cable, in a majority of cases, the issue is simply a matter of following, or more specifically, not following the installation instructions.

    If you are having trouble with the programming cable for your radio, here is a list of resources that may help you troubleshoot and resolve the issue.

    How to install the XLT Painless Programming Cable

    XLT Painless Programming Cable installation video

    How to install the Wouxun programming cable and driver

    How to install the Programming Cable and Software for the KG-905G

    How to install an FTDI Programming Cable on newer versions of Windows 10

    FTDI driver update bricks cloned programming cables

    How to install the Baofeng USB programming cable and software

    What to do if the programming cable does not work

    What to do if the programming cable does not detect the radio

    What to do if the radio programming software does not detect the cable or COM port

  • Wouxun KG-1000G Plus programming and menu options

    Wouxun-KG-1000G Plus DisplayThe Wouxun KG-1000G Plus GMRS Base/Mobile Two Way Radio is an improved, updated iteration of the original KG-1000G. Like its older counterpart, it transmits on 15 simplex GMRS channels and 8 GMRS repeater channels, has 7 NOAA weather channels and receives on multiple bands, including 2 meter, (144-148 MHz), 70cm (420-450 MHz), 6 meter (50.1-54 MHz) and airband frequencies on AM. It retains all the same basic features of the KG-1000G and adds a more organized menu, plus a few new options for even greater functionality. Overall, this is a transceiver for licensed operators who want an enhanced GMRS experience at a modest premium.

    The KG-1000G Plus is not only a powerful mobile GMRS radio, it also makes an awesome base station. When connected to the Wouxun SPS31WIN, Samlex SEC-1235M or similar power supply, the KG-1000G Plus is an awesome desktop GMRS radio. When connected to a second KG-1000G or KG-1000G Plus as shown in this tutorial video, a pair of these radios can operate as a GMRS repeater!

    KG-1000G Plus Key Features

    • 22 Simplex GMRS Channels
    • 8 GMRS Repeater Channels
    • 7 NOAA Weather Channels
    • 50-53.995 MHz (6m) (Receive Only)
    • 108-179.995 MHz VHF (Receive Only)
    • 320-349.995 MHz (Receive Only)
    • 400-479.995 (70cm) MHz (Receive Only)
    • 700-985 MHz (Receive Only)
    • AM 108-136MHz (Receive Only)
    • 87.5-108MHz FM Radio (Receive Only)
    • 50W Maximum Transmit Power
    • 4 Transmit Power Levels
    • 999 Total Custom Memory Channels
    • Dual Frequency Display
    • Remote Head Mounting Capability
    • Three Color Selectable LED
    • Repeater Capability
    • Repeater Offset Support
    • GMRS Repeater Operation Mode (Second KG-1000G Plus Required)
    • Standard and Non-Standard CTCSS/DCS
    • Split CTCSS/DCS Tone Support
    • Priority Channel Scanning
    • Frequency Scanning
    • CTCSS/DCS Tone Scan
    • Simultaneous Scanning on A/B Areas
    • Auto-Detect AM Transmissions
    • Dual Speakers with Independent Volume Controls
    • Dual 3.5mm External Speaker Ports
    • Backlit DTMF Speaker Microphone
    • Incoming Caller ID Display
    • Custom Display Message
    • DTMF Encoding and Decoding
    • Channel Name Edit and Display
    • Group Calls, All Call and Selective Call
    • Supports 10 Scan Groups
    • 8 Group Descramble
    • Companding
    • Wide/Narrow Bandwidth Selectable
    • Busy Channel Lockout
    • Power Management
    • English Voice Prompts
    • Roger Beep Enable/Disable
    • Minimum Operating Voltage Alarm
    • Stun/Kill Function
    • Single Tone Pulse Frequency
    • Keypad Lock
    • Cooling Fan
    • Adjustable Cooling Fan Control
    • Automatic Temperature Testing
    • Timeout Timer
    • PC Programmable
    • 4 Configurable Front Panel Buttons
    • Reset

    Programming the KG-1000G Plus
    Programming the Wouxun KG-1000G Plus is essentially the same as programming the original KG-1000G, and with a few added options. You can do it directly from the DTMF keypad on the speaker microphone or through a PC using the Wouxun KG-1000G Plus programming software.

    Direct from the radio
    If you are already familiar with the steps to program channels and frequencies into the Wouxun KG-1000G or other Wouxun mobile radios, programming the KG-1000G Plus directly from the radio itself is pretty much the same. If you haven't programmed a Wouxun mobile before or you are new to programming any two way radio, relax. The KG-1000G Plus owners manual is carefully written in plain English and is easy to understand, even when explaining some of the advanced features of the radio.

    The KG-1000G Plus menu consists of 66 options. Default settings are bold.

    Menu # Menu Item Description Option
    01 SQL Squelch Settings 0-9|5
    02 W/N Wide/Narrow Bandwidth Settings NARR (12.5k)|WIDE (25k)
    03 BACK-LT Display Backlight Timeout OFF|ALWAYS|1-20S
    04** REPEATER Offset Frequency Settings OFF|ON
    05 TX-POWER Output Power LOW|MED|HIGH
    06 TDR Dual Display OFF|ON
    07 WORKMODE Work Mode CH-NAME|FREQ|CH-NUM|CH-FREQ
    08***** FM-RADIO FM radio function ON|OFF
    09 RX-CTCSS Tone Receiving CTCSS 1-50|OFF
    10 TX-CTCSS Tone Transmitting CTCSS 1-50|OFF
    11 RX-DCS Code Receiving DCS 1-105|OFF
    12 TX-DCS Code Transmitting DCS 1-105|OFF
    13 SCANMODE Scan Mode TO|CO|SE
    14**** SCAN-GRP Scan Group Settings ALL|GROUP(01-10)
    15*** SCAN-ADD Scan Add/Delete ON|OFF
    16 SCAN-CTC Scan CTCSS [Press Menu to Activate]
    17 SCAN-DCS Scan DCS [Press Menu to Activate]
    18**** TONESAVE CTCSS/DCS Tone Save Options RX|TX|RX-TX
    19 TONESCAN CTCSS/DCS Scan Filter ON|OFF
    20 PRI-SCAN Priority Scan OFF|ON-STBY|ON-ALWYS
    21 PRI-SAVE Set Priority Channel 999 channels
    22 PRI-SEL Priority Channel Select 999 channels
    23** STEP Step frequency settings 2.5k to 100.0k|5k
    24 ROGER Roger beep OFF|BOT|EOT|BOTH
    25 TOT Timeout Timer 1-60 minutes|2MIN
    26 TOA Transmission overtime alarm 1-10 seconds|OFF|5
    27 VOICE voice prompt settings ON|OFF
    28 BEEP beep prompt settings ON|OFF
    29 BUSYLOCK Busy Channel Lockout ON|OFF
    30*** CH-NAME Edit a channel name Name***
    31 CH-ADD Add Memory Channel 999 channels
    32 CH-DEL Delete Memory Channel 999 channels
    (Priority Channels not deletable)
    33 DESCRAMB Descrambler OFF|SCRAM 1-8
    34 COMPAND Compander ON|OFF
    35 SP-MUTE Speaker Mute QT|QT+DTMF|QT*DTMF
    36 ID-EDIT Edit Radio ID 0-9|101
    37 DTMF-ID Radio ID Settings OFF|BOT|EOT|BOTH
    38 DTMF-DLY DTMF Delay 100~1000ms100ms
    39 DTMF-INT DTMF Interval 60~500ms80ms
    40 DTMF-DUR DTMF Duration 80~500ms80ms
    41 SIDETONE DTMF Sidetone Settings OFF|DTMF|ID|DTMF+ID
    42 RING Ring Time OFF|1-10 seconds|3S
    43 ALERT Tone Alert 1750Hz|2100Hz|1000Hz|1450Hz
    44* REM-CTRL Remote Control ON|OFF
    45***** AM-MODE AM Mode ON|OFF
    46***** AM-AUTO Auto Detect AM ON|OFF
    47 AUTOLOCK Auto Lock ON|OFF
    48 AUTO-OFF Auto Power Off OFF|30MIN|60MIN|90MIN|120MIN|150MIN
    49 MED-PWR Medium Power Setting 20W|10W
    50 VOLT-ALT Low Voltage Alert ON|OFF
    51 FAN-SET Fan Activation Setting TX|VHT+TX|ALWAYS
    52 SPEAKER Speaker Setting RADIO|MIC|BOTH
    53 RPT-TONE Squelch Tone OFF|ON
    54 RPT-MODE Repeater Mode OFF|RPT-RX|RPX-TX
    55 RPT-SPK Repeater Speaker Setting ON|OFF
    56 RPT-PTT repeater PTT Setting ON|OFF
    57 RPT-DLY Repeater Hold Timer OFF|100MS-5000MS
    58 WT-LED Standby LED Color OFF|RED|ORG|GREEN
    59 RX-LED Receive LED color OFF|RED|ORG|GREEN
    60 TX-LED Transmit LED color OFF|RED|ORG|GREEN
    61 KEY-PF1 Side Key Assignment OFF|REVERSE|PRI-SEL|SQUELCH|TX-POWER|SCAN|SCAN-CTC|SCAN-DCS|FM-RADIO|WEATHER|CH-ADD|W-N |TDR|WORKMODE|BAND|REPEATER|LOCK|MONITOR
    62 KEY-A Key A Assignment OFF|REVERSE|PRI-SEL|SQUELCH|TX-POWER|SCAN|SCAN-CTC|SCAN-DCS|FM-RADIO|WEATHER|CH-ADD|W-N |TDR|WORKMODE|BAND|REPEATER|LOCK|MONITOR
    63 KEY-B Key B Assignment OFF|REVERSE|PRI-SEL|SQUELCH|TX-POWER|SCAN|SCAN-CTC|SCAN-DCS|FM-RADIO|WEATHER|CH-ADD|W-N |TDR|WORKMODE|BAND|REPEATER|LOCK|MONITOR
    64 KEY-C Key C Assignment OFF|REVERSE|PRI-SEL|SQUELCH|TX-POWER|SCAN|SCAN-CTC|SCAN-DCS|FM-RADIO|WEATHER|CH-ADD|W-N |TDR|WORKMODE|BAND|REPEATER|LOCK|MONITOR
    65 KEY-D Key D Assignment OFF|REVERSE|PRI-SEL|SQUELCH|TX-POWER|SCAN|SCAN-CTC|SCAN-DCS|FM-RADIO|WEATHER|CH-ADD|W-N |TDR|WORKMODE|BAND|REPEATER|LOCK|MONITOR
    66 RESET Factory Reset VFO|ALL

    *Note: The menu item in red is available in the menu for display only. It can be modified through optional programming software.
    **The menu item in yellow is available in Frequency mode only.
    ***The menu item in green is available in Channel mode only.
    ****The menu item in violet is not available in repeater mode.
    *****The menu item in orange is available on Area "A" only.

    Programming with software
    The KG-1000G Plus uses the same PCO-003 USB programming cable as many other popular Wouxun mobile radios, including the KG-UV920P-A, KG-UV950P, KG-UV980P and original KG-1000G. Simply follow the Wouxun KG-UV920P-A cable driver installation instructions.

    Unlike the programming cable, the Wouxun KG-1000G Plus programming software is specific to the radio and is currently available for Windows PCs only. The programming software is located under the Downloads tab on the Wouxun KG-1000G Plus product page at Buy Two Way Radios.

    KG-1000G Plus Operation
    Working the KG-1000G Plus is almost exactly same as operating the original KG-1000G. In fact, it is essentially the same radio, so the console, key layout and dual speakers are identical for both radios. It uses a slightly modified version of the KG-UV10A hand speaker microphone with a few buttons that are re-labeled specifically for the Plus. The speaker microphone plugs into a jack located on the right side when facing the front panel. The location of everything else on the front panel is also the same as the aforementioned KG-1000G, including the LCD display, dual volume control knobs and large channel knob.

    The keys and their primary functions are listed in the chart below:

    Button Operation
    UP ARROW Select previous channel/frequency|Select menu option
    DOWN ARROW Select next channel/frequency|Select menu option
    AREA Change master channel (A/B Area)/single tone pulse
    1-WX Weather Mode
    2-MHz Frequency/channel selection
    3-BAND Band switch
    4-CH-ADD Save channel
    5-PWR Set Power output (H/L)
    6-MODE Frequency mode/Channel mode switch
    7-RPT Repeater Mode Switch
    8-TDR Single/dual display switch
    9-SQL Set Squelch level
    0-SCRAM Descrambler
    *-SCAN Scanning
    #-LOCK Key lock
    MENU Enter program menu|choose/set menu option
    EXIT Exit program menu/cancel

    As a GMRS radio alone, the Wouxun KG-1000G Plus is a great value. As a mobile/base station radio or repeater, it can add even greater versatility to your GMRS experience.

  • List of GMRS Frequencies and Channels

    All of the GMRS radios we sell at Buy Two Way Radios operate on the same 22 GMRS channels and frequencies assigned by the FCC. Many of these models support the 8 FCC assigned GMRS repeater channels as well. We are sometimes asked for the exact frequencies of these channels. The chart below lists these frequencies, along with their channel numbers, maximum allowable power, and maximum allowable bandwidth.

    GMRS Simplex Channels and Frequencies
    Channel Frequency Max Power Bandwidth
    1 462.5625 5W 25kHz*
    2 462.5875 5W 25kHz*
    3 462.6125 5W 25kHz*
    4 462.6375 5W 25kHz*
    5 462.6625 5W 25kHz*
    6 462.6875 5W 25kHz*
    7 462.7125 5W 25kHz*
    8 467.5625 0.5W 12.5kHz
    9 467.5875 0.5W 12.5kHz
    10 467.6125 0.5W 12.5kHz
    11 467.6375 0.5W 12.5kHz
    12 467.6625 0.5W 12.5kHz
    13 467.6875 0.5W 12.5kHz
    14 467.7125 0.5W 12.5kHz
    15 462.5500 50W 25kHz*
    16 462.5750 50W 25kHz*
    17 462.6000 50W 25kHz*
    18 462.6250 50W 25kHz*
    19 462.6500 50W 25kHz*
    20 462.6750 50W 25kHz*
    21 462.7000 50W 25kHz*
    22 462.7250 50W 25kHz*
    GMRS Repeater Channels and Frequencies
    Channel RX Frequency TX Frequency Max Power Bandwidth
    RPT15 462.5500 467.5500 50W 25kHz*
    RPT16 462.5750 467.5750 50W 25kHz*
    RPT17 462.6000 467.6000 50W 25kHz*
    RPT18 462.6250 467.6250 50W 25kHz*
    RPT19 462.6500 467.6500 50W 25kHz*
    RPT20 462.6750 467.6750 50W 25kHz*
    PRT21 462.7000 467.7000 50W 25kHz*
    RPT22 462.7250 467.7250 50W 25kHz*

    *Note: 20kHz Authorized Bandwidth.

    Wouxun KG-XS20G Mobile GMRS 2-Way Radio Wouxun KG-XS20G
    Mobile GMRS radio with 30 channels and extreme long range.

Items 11 to 20 of 174 total

CUSTOMER REVIEWS